
When most people first learn AWS Auto Scaling, it feels very theoretical.
You may heard terms like:
- scaling policies,
- launch templates,
- target tracking,
- CloudWatch alarms,
but it’s difficult to understand how everything actually works together in a real environment.
So I decided to build a practical setup and intentionally put the infrastructure under pressure ( I used Locust, you can use Stress as well) to watch Auto Scaling respond in real time.
In this project, I built a small scalable architecture on AWS using:
- EC2
- Application Load Balancer
- Auto Scaling Groups
- RDS
- Route 53
and then generated traffic using Locust to see the infrastructure scale automatically.
This ended up being one of the best hands-on projects for understanding how modern cloud infrastructure behaves under load.
The Architecture
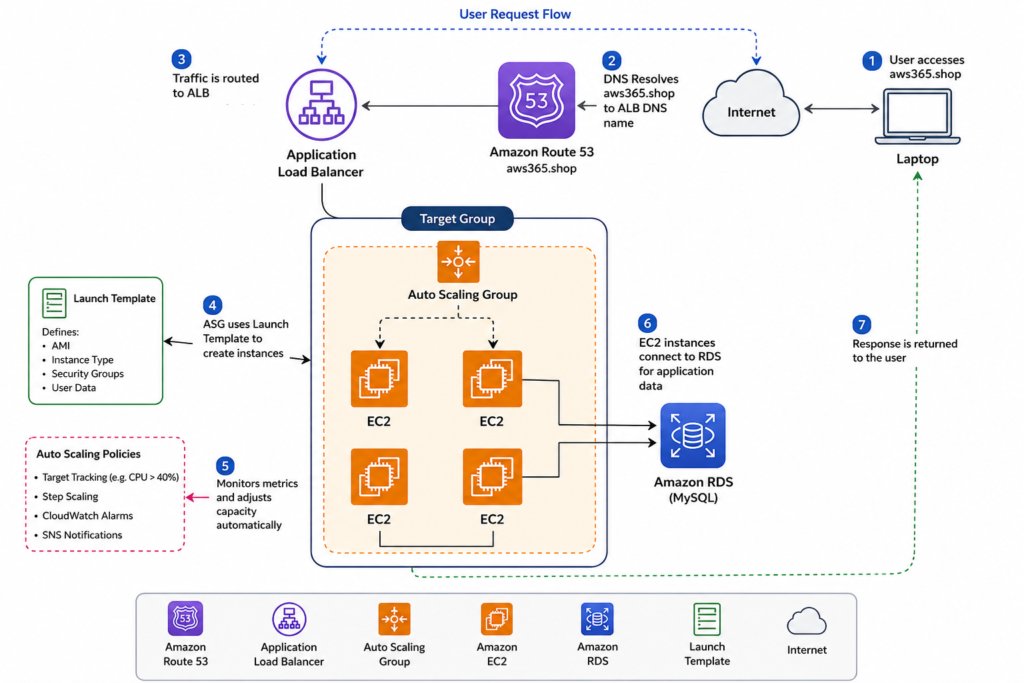
The setup was fairly simple but realistic enough to demonstrate actual scaling behavior.
Traffic flow looked like this:
Route 53 → Application Load Balancer → Auto Scaling Group → EC2 Instances
The application itself used:
- Python Flask
- MySQL database on RDS
One important thing I wanted to avoid was storing data directly on EC2 instances.
That becomes a problem once scaling starts.
Vertical Scaling vs Horizontal Scaling
Before setting up Auto Scaling, I first wanted to understand the difference between:
- vertical scaling
- horizontal scaling
Vertical Scaling
This means:
- increasing CPU
- increasing memory
- upgrading instance size
Example:
t2.micro → t3.large
The problem:
- it often requires downtime
- scaling has limits
- eventually one server becomes a bottleneck
Horizontal Scaling
This means:
- adding more servers instead of upgrading one machine
Example:
2 EC2 instances → 4 EC2 instances
This is much more flexible and commonly used in cloud-native systems.
That’s what Auto Scaling focuses on.
Why I Used RDS
One thing I realized quickly:
If application data lives directly on EC2,
Auto Scaling becomes messy.
Because when instances terminate:
- local data disappears
So I used Amazon RDS for MySQL instead.
This keeps the EC2 instances mostly stateless.
Important Real-World Concept
Keep:
- application compute on EC2
- persistent data in RDS
This makes scaling much cleaner.
Deploying the Application
The application setup involved:
- cloning the repository
- installing Python dependencies
- configuring Flask
- creating a systemd service
Basic example:
pip install -r requirements.txt
Then I configured the application to start automatically using systemd.
Creating an AMI
Once the EC2 instance was fully configured and tested,
I created an AMI (Amazon Machine Image).
This is important because:
- Auto Scaling launches new servers automatically
- every new server must look identical
The AMI acts as the base template.
Launch Templates
After creating the AMI,
I created a Launch Template.
The Launch Template defines:
- which AMI to use
- instance type
- Security Groups
- startup configuration
This tells the Auto Scaling Group exactly how to create new instances.
Configuring the Auto Scaling Group
The Auto Scaling Group configuration looked like this:
| Setting | Value |
|---|---|
| Desired Capacity | 2 |
| Minimum Capacity | 1 |
| Maximum Capacity | 4 |
This means:
- normally 2 servers stay active
- AWS can increase to 4 during heavy traffic
- scale down later when traffic decreases
Target Tracking Scaling Policy
For the first scaling method,
I used:
Average CPU Utilization
Example threshold:
40%
If average CPU usage crosses the threshold:
- AWS launches additional EC2 instances automatically.
Watching Scaling Happen Live
One thing that made the project really interesting was watching the scaling happen in real time.
At first, the infrastructure was stable with two EC2 instances.
Then after traffic increased:
- CPU utilization increased
- CloudWatch metrics changed
- Auto Scaling triggered
- new EC2 instances launched automatically
Seeing that process live made the concept much easier to understand.
Step Scaling & CloudWatch Alarms
I also explored:
- Step Scaling
- CloudWatch alarms
- SNS notifications
This allows more advanced scaling logic.
Instead of simple CPU thresholds,
you can scale:
- gradually,
- aggressively,
- or differently based on traffic levels.
Using Locust for Load Testing
To simulate traffic,
I used:
Locust
Locust helped generate concurrent requests against the application.
This allowed me to:
- simulate real traffic
- increase load intentionally
- observe Auto Scaling behavior
Without traffic generation,
scaling is difficult to demonstrate properly.
Real Testing Scenario
One thing I wanted to test was:
- resilience
So I intentionally:
- terminated EC2 instances
- restarted database services
- generated traffic spikes
The architecture continued serving traffic because:
- the ALB routed traffic correctly
- Auto Scaling replaced unhealthy instances
- RDS stored persistent data separately
That’s when the architecture started feeling “real.”
What I Learned
A few things became very clear after building this:
1. Stateless architecture matters
If EC2 stores important data locally,
Auto Scaling becomes painful.
2. Automation is everything
Without Launch Templates and scaling policies,
manual scaling becomes inefficient.
3. Monitoring is critical
CloudWatch metrics and alarms drive scaling decisions.
4. Load testing changes understanding
Actually stressing the infrastructure teaches much more than theory alone.
Common Beginner Mistakes
Some common issues I faced or noticed:
- forgetting Security Group rules
- incorrect health checks
- scaling policies too aggressive
- storing application data on EC2
- wrong target group configuration
A small misconfiguration can stop scaling entirely.
Important AWS Cost Reminder
Auto Scaling projects can accidentally generate costs if resources are not cleaned up.
This includes:
- EC2 instances
- RDS databases
- Load Balancers
After testing:
- delete the ASG
- remove ALB
- terminate unused instances
- clean up RDS if not needed
especially when experimenting.
Full Practical Video Walkthrough
I also created a complete hands-on walkthrough covering:
- Route 53 setup
- Application Load Balancer
- Auto Scaling Groups
- Launch Templates
- RDS configuration
- Flask deployment
- CloudWatch alarms
- Load testing with Locust
- Real-time scaling demonstration
along with practical troubleshooting and infrastructure explanations.
👉 Watch the full walkthrough here:
Why This Project is Valuable
This type of project teaches several real-world DevOps concepts together:
- cloud scalability
- infrastructure automation
- high availability
- load balancing
- monitoring
- stateless architecture
Instead of learning AWS services individually,
you understand how production systems actually work together.
Final Thoughts
Auto Scaling becomes much easier to understand once you actually see infrastructure reacting to traffic in real time.
Watching EC2 instances:
- launch automatically,
- register behind the load balancer,
- and handle traffic spikes
makes cloud concepts feel much more practical.
Hands-on projects like this teach far more than memorizing documentation alone.
What You Should Do Next
If you’re learning AWS or DevOps,
try building this setup yourself:
- deploy a simple application
- add an ALB
- configure Auto Scaling
- generate traffic
- watch scaling happen
That practical experience teaches a lot.
👉 Bonus Tip
After understanding Auto Scaling,
explore:
- Kubernetes Horizontal Pod Autoscaler
- ECS Auto Scaling
- Spot instances
- Blue/Green deployments
- Infrastructure as Code with Terraform
These concepts become much easier once the scaling fundamentals are clear.
Related Guides
If you’re learning AWS and DevOps, also check:
- AWS WAF Explained
- S3 + CloudFront Setup
- WordPress on AWS with ALB & SSL
- OpenVPN + VPC Peering
- K3s on AWS EC2
About the Author
Madhukar Reddy is a DevOps engineer focused on AWS, Docker, Kubernetes, cloud infrastructure, and cyber security. He shares practical cloud and DevOps content based on hands-on deployments, infrastructure troubleshooting, and real-world learning projects.
2 responses